ing

This site is full of creative poetry/art exercises that aim to bring pleasure back into using words and writing. We welcome the participation of you and your child, please have a look at the list of contents, or the blog archive and try out any of the exercises that you like the look of. We welcome your comments on the success (or otherwise) of the idea…
Showing posts with label workshops. Show all posts

Monday, 17 January 2011

Customised trainers


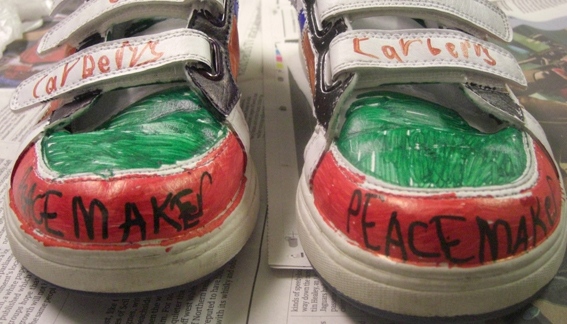
On Saturday Phil and I started the first of 5 workshops for The Bubble Project. One of the creative ideas we introduced to the children was customising trainers. We had a selection of trainers,  some kindly donated from my sons School (Hayfield Primary) which I had whitewashed, and some the Young Carers had brought in. Inspired by their paintings from earlier in the day and street art, they created their own moveable artworks. 


Here are some ideas you might like to try:


Write this poem FAST. Imagine that you can run faster than any human being has ever run before, faster than any car, so fast that you can fly. 


INSTRUCTIONS


Write one line or more in answer to each of these questions. 
What does it feel like to run at amazing speed? 
Where would you run to? 
What would you like to leave behind? 
Where would you finally come to rest? 


Have a go at writing your poem on a trainer, here's how: 


TRAINER CUSTOMISATION


  1. Choose your trainers (make sure you've had permission from a grown up before you paint or draw on them!)
  1. You might want to give yourself a white blank space to work with. If so, paint on some of the white emulsion paint first, let it dry before doing any more painting.
  1. Before you do anything to your soon-to-be-customized trainers, its best to do a rough sketch of your plan on paper. This will help you to visualize your masterpiece before you start working with permanent paints.
  1. Choose your materials, permanent markers work really well, and you could add sequins, jewels, badges, safety pins.... Based on your sketch, choose the right size pen tip for your image. The thinner the tip the easier it will be to draw details and get to hard to reach spaces. Thicker tips are great for filling in larger areas.
  1. Carefully create an outline of your design on your trainers, using a pencil or a fine tip pen. Only draw the basic patterns, leave the details for later. Do you want to have matching trainers? If so place them side by side and make sure everything looks well defined and symmetrical. 
  1. Have fun with the colouring in. Carefully start with the lightest colours, save the darkest for last so you can cover any mistakes near to the end. When you’ve filled in our outline, make sure its completely dry before adding detail and any outlines you may want.
  1. If you like add some extra’s like the Jewels or feathers… Make sure all the paint is completely dry before adding extra’s. Things like safety pin, badges etc can be added for a bit of punk if you fancy.
  1. Put them somewhere safe to dry, and don’t touch for a day and night!


Friday, 5 November 2010

A brain of a dream of a dog


Our first workshop in Warrington with young carers and children from Women’s Aid, mostly pre-teens, took place last Friday. An ice-breaker for all of us, we let the participants steer much of the session, building trust and emphasising playfulness. By getting a sense of the group when they were relaxed, we were able to gauge how they might be able to explore more deeply.

concrete poem on a plaster
The art-room in Warrington Peace Centre was set up with separate spaces for five different exercises, plus extra materials from Derek (Warrington Museum and Art Gallery) who had commissioned this initial workshop and came to lend his support. We would try overwriting, fold-in and some variants on concrete poetry and collage, using pens, postcards and stencils. 

The Dead
The intention was to build on this session in order to run further workshops focussed on text/art self-portraits. It was also a chance for Derek to see us in action and decide if our approach fitted the group. Because the first session was on the doorstep of Halloween, the young carers arrived in their finest, witchiest costumes and face-paint. We decided to busk along this theme, using the excuse of spookiness to explain the weird effect of some of the pieces.

Spooky World
Overwriting (a la Bob Grenier) combined with ‘wrong hand’ writing, was used to create badges with a 50s horror movie flavour. We hope to come back to this ‘wrong hand’ technique again, with the group exploring the push/pull between positive and negative self-image. Badges are a form of self-labelling; these ones were essentially fancy dress, the equivalent of a ghost mask, but the same method can be used to go deeper under the surface. For this day, the big success was the enthusiasm which met these little bits of mini-writing. An industrious girl made six badges and clinked as she walked away at the end of the afternoon.
Stencil Face
The concrete poem faces were very simple, game-like. Again, this was an easy way into a technique that is extraordinarily expressive; we will return to it. One of the delights was that a young girl F who had literacy problems was able to make a witty poetic piece, completely unhampered by (and unaware of) her spelling.
F also contributed beautifully to the largest piece of the day, a cross-section of a brain that people wrote dream fragments into (this was the fold-in writing). F wrote a short sentence, needing letter-by-letter guidance. “What else can I do?” she asked.
“Can you draw?” I enquired.
A Brain of a Dream of a Dog
Not only could she draw, but was bursting to do so. She was joined by Kitty, whose specialty was drawing dogs. And so the brain became a figment of a dreaming dog’s imagining, filled with further dreaming dogs, dream bones, cats up trees, a cat and crossbones, and a doggy spiel written by the irrepressible Billy. A brain of a dream of a dog was a piece of splendid whimsy, co-drawn-and-written by roughly ten of the group. Co-operative pieces like this tend to be unwieldy, but are great to get a group working as a team and also quieten criticism.


The collage-making produced some of the most subtle pieces of the day, recycling postcards into little dioramas with intriguing perspective shifts and lush textures. The makers of these pieces also seemed to be the most introspective, moving quietly into the imagined space of their postcard worlds.


The workshop was a very joyful day of silliness and messing, with a serious undercurrent. We were very aware of the backgrounds of the young people and the thin ice that some of them walk across day-to-day. The question is: how to develop the exercises, to reflect this experience without intruding?

For more images please visit http://www.flickr.com

We will run number of one day workshops, relating carers' experiences and emotions in a creative manner. This will link this to the exhibition at Warrington Museum and Art Gallery by American street artist Elbow-Toe who creates collages and prints depicting the emotions of the inner person. We will use portraiture combined with poetry; work will be displayed in the town centre and/or gallery.

As with our hospital work, the pace of exploration will be determined by the participants themselves - it’s their choice. Enthusiasm is a key in all this and so we will revisit the things that elicited the best responses to see where they lead. The badges are a particularly popular activity and can open out into various kinds of writing and self-portraiture, including photography, so they will feature. The group piece was a gand way to gather all the ages and abilities into one space and we will experiment with this further, with a tighter brief. We hope to visit the Elbow-Toe exhibition with the groups, to focus our work and move it into an introspective mode.


Tuesday, 2 November 2010

a drop in workshop and a screaming badge

Last Friday we ran a drop in workshop day with a group of Young Carers at the Peace Centre in Warrington.  We played with lots of ideas from our Boys Can Write collection, themed around Halloween, including scary stencil faces, grisly plaster poems, screaming badge making and nightmarish poetry making. You can see the results on our portfolio site at www.flickr.com


Thanks to Derek at Warrington Museum and Art Gallery for such a smoothly run event.


To make your own screaming badge..

You will need a red and black pen, scissors, something to create a circular shape and sticky tape.

1. What makes you scream? It could be a scream of excitement or joy, or something that makes you scream with terror.
2. If there are any spelling that you are unsure about, practice them on a separate piece of paper.
3. On card or thick paper, write with a red pen, holding it in your teeth.
4. Then with a black pen, write it again using your 'wrong' hand.
5. If you like you can repeat the words writing with your feet, or getting someone to shake the paper, or turning the paper around, or writing with the palms of your hands.
6. Find something to draw around, such as a mug or eggcup, draw a circle around your most marvellous piece of writing.
7. Cut out your badge shape, attach a safety pin with a bit of tape and wear with pride. You are now officially scary.

PS. For a completely different result with a similar technique, look at the beautiful meditative work of the American poet Bob Grenier at http://www.whalecloth.org